|
I
recently had the chance to convince a long-time friend of mine to send
over one of his custom AMD upgrade kits. I first met John Moffett while
working for the All Games Network. Dr. John, (as he is commonly known),
runs a small web store that supplies custom Intel and AMD upgrade kits for
avid overclockers called KickAss
Gear. He was one of the first sponsors AGN ever had, and as such, we
used to be in frequent contact.
Now I had been wanting
to test out one of AMD’s new 1Ghz systems for quite some time now, but I
hadn’t been able to get AMD to send over some samples. Dr. John quickly
came to the rescue, offering one of his custom Thunderbird Athlon upgrade
kits for a review. The Athlon upgrade kits officially consist of a 900Mhz
Socket A Athlon processor based on AMD’s new Thunderbird core and an
ABIT KT7A-RAID jumperless motherboard. My review kit consisted of a
clock-unlocked 1Ghz Thunderbird processor and an ASUS A7V133 Socket A
motherboard, based on VIA’s KT133 chipset.
At a base price of
$329, the basic Athlon upgrade kit might seem a bit pricey, but with this
price you are also guaranteed a processor that will be taken to its
highest possible speed. Each kit is fully tested at the highest attained
speed and is also burned in for proper and reliable operation. This
ensures that you will get a high-performance system as soon as you get it
installed on your computer case.
Installation Process:
By now, many of you
must have heard of the installation headaches suffered by many early
adopters of the Athlon\VIA architecture. I’m happy to report that these
installation issues have become a thing of the past, (as has been the case
for quite a long time now). The ASUS motherboard went into my Antec
mid-tower case without any problems, and it happily accepted my two sticks
of 128MB Corsair PC-133 SDRAM, my IBM 34GXP 30GB ATA66 hard drive,
Creative Labs GeForce 2 Ultra video card, and Sound Blaster Live! Platinum
5.1 PCI sound card.
The system booted up
perfectly and without any fuzz on the first try, a good indication of
things to come. Like stated before, the ASUS A7V133 is based on VIA’s
KT133 chipset, which was released to specifically accommodate AMD’s new
Duron and Thunderbird processor cores. The board itself also features an
integrated Promise Technologies’ Ultra ATA 100 IDE controller with RAID
0 support, support for 1Ghz+ Athlon processors, four IDE connectors, three
DIMM slots, 100 and 133Mhz EV6 bus speed support, and jumperless
adjustments of bus speeds and clock multipliers. Besides these features,
the board is fully PC99 compliant, and also features support for
wake-on-ring, wake-on-LAN, suspend to RAM, etc
It follows a less than
ideal 1/4/1 expansion slot set up, featuring 1 AGP Pro slot, 4 PCI slots,
and one shared PCI/AMR slot. Personally, I prefer the six PCI/ISA
configuration, but then again, the only expansion cards I run are the
video card and sound card, so it’s not like I’m clamoring for more PCI
expansion possibilities. One nice touch included on the AGP Pro slot is
that ASUS has covered the extra portion of the AGP Pro slot for users that
are installing regular AGP cards. If you were going to install an AGP
Pro-compliant video card, then you would have to remove the protective
plastic that covers the extra real estate. This will help to avoid users
inserting their cards incorrectly.
ASUS chose to use the
popular Award BIOS system, which I personally prefer. I have used BIOS
systems from Phoenix, and while they feature nice graphical interfaces,
they don’t quite offer the same amount of information you get from an
Award BIOS. Being a jumper-less motherboard, (but still including jumper
blocks for those people that feel inclined to use them), you can adjust
every single operating parameter from within the Award BIOS shell. This
means that you will be able to specify custom front side bus speeds,
custom clock multipliers, (in the case of clock-unlocked processors), set
the operating speed of your memory independently from the bus speed,
adjust peripheral parameters, etc. The BIOS correctly detected the 1Ghz
Athlon processor, and being an unlocked CPU, it harbors some nice
overclocking potential
Barring the incident
with the ATX power supply connector, (whoops… : ), the only other
installation problem I encountered was a single IRQ conflict between my
Sound Blaster Live! Platinum 5.1 and the Promise ATA-100 controller. I
originally had installed the SB Live! in the second PCI slot, but that
slot shares an IRQ with the Promise ATA-100 controller. Thankfully, the
Award BIOS detected the problem and let me know that a conflict could
occur unless I moved the sound card to another slot. Sure enough, during
the first WinME boot up, the system locked up. Moving the sound card to
the third PCI slot solved the problem, and the BIOS warning disappeared
after making the change. It’s nice to have a BIOS that detects problems
and warns you of impending trouble.
ASUS A7V133 Motherboard
In Detail:
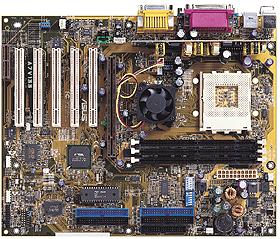
Even though the standard
KickAss Gear Athlon upgrade kit ships
with an ABIT KT7A-RAID Socket A motherboard, Dr. John sent me an ASUS A7V133
Socket A motherboard, based on VIA’s KT133 chipset. As stated above, the
board comes in a 1\4\1 slot configuration, featuring 1 AGP Pro slot, 4 PCI
slots, and a shared PCI\AMR slot.
As is the case with all
of ASUS’ motherboards, the included installation and usage manual is one
of the best in the industry. In some instances too informative, the
user’s manual should be the first place any user should look for when
searching for jumper parameters, or for troubleshooting tips. In fact,
ASUS went as far as building a list of the shared IRQs between the PCI
slots and the different components on the motherboard. This way, you will
know instantly where not to install your PCI expansion cards, saving
people a lot of time in trying to diagnose IRQ conflicts.
Like the old 440BX
motherboards that integrated the then new ATA-66 IDE controllers, the
A7V133 ships with four IDE connectors. Two of these support the new ATA100
spec, and are also backwards compatible with the ATA66 and ATA33
standards. The other two IDE connectors are standard accept ATA66 and
ATA33 devices. ASUS decided to use the Promise ATA-100 controller for
ATA100 drive management. As such, you can connect up to eight different
IDE devices to this motherboard, two per connector in the standard
master-slave configuration. For this system, I connected an IBM 34GXP 30GB
ATA66 hard drive as master on the primary IDE connector and an AOpen 1040
Pro 10X DVD-ROM drive as the master on the secondary channel. The Promise
ATA-100 controller also allows a user to run a RAID 0 array with similar
hard drives. Unfortunately, I did not have identical hard drives in order
to test this feature.
Even though the A7V133
motherboard includes a jumperless design and a compliant BIOS, ASUS
decided to keep the jumper blocks on the PCB. One of the blocks controls
the CPU multiplier setting, while the other block controls the front side
bus speed. Like I said, the motherboard is fully jumperless, but the
blocks are there for people that prefer to set these options manually. The
A7V133 also includes support for up to four USB ports, thanks to the VIA
VT82C686B “Super I\O” southbridge.
The upgrade kit has
already spent two weeks in the lab. Component installation and OS
installation took me two days. Since that time, the system has been up
without interruption for a week and a half. In that time, the system has
only been reset three times. Under this heavy load, the system only
crashed one time while playing Counter-Strike. At that point, the system
was severely low in resources, so the crash didn’t really surprise me.
After that period, the system was shut down for the first time around
three days ago, when I started my benchmarking runs. But this kind of
reliability says a lot about ASUS’ manufacturing standards. Personally,
when I’m building systems for personal use, I always try to build the
most stable system possible, even if I have to sacrifice a little in the
performance department. The main reason for this is that I cannot afford
any kind of downtime due to malfunctions or conflicts. As such, ASUS
motherboards are hard to beat, as they are some of the most rock-solid
products users can ever hope to buy.
About the only fault I
could find with the design of the A7V133 is the fact that there is no BIOS
reset jumper. Well, there is a BIOS reset jumper, but it’s not the kind
of jumper we have all come to know and love. Instead, ASUS decided to
include only two small contact points, which can only be shorted out using
a small metal part to cover both contact points. As if shorting out a
jumper weren’t tough enough, we know have to use a metal part to short
out two contact points in the unlikely case a BIOS reset is needed. And as
it turned out in my case, it was really tough to reset the CMOS… at one
point during the overclocking tests, I accidentally set the FSB to 133Mhz
while keeping the clock multiplier at 12, yielding almost 1.6Ghz. As
expected, the computer would not even post, and as such, the BIOS failsafe
described in the next paragraph could not engage. Shorting out those
damned points took me 30 minutes, as I couldn’t get solid contact
between both points.
Of course, that bad
point is accompanied by a host of good points, the most important of which
is the fact that the BIOS will go into “safe mode” after an
overclocking-related lock-up or freeze. In this mode, when the computer is
restarted, the motherboard enters the BIOS automatically and sets up the
processor parameters for a safe reboot, with the Front Side Bus set to
100Mhz and memory also set at 100Mhz. This measure goes a long way towards
protecting your shinny new processor from damage due to failed
overclocking attempts.
The ASUS A7V133 also
features a clean and uncluttered design, which is always something users
should look for when shopping for a new motherboard. The VIA 8363A
Northbridge also includes it’s own cooling fan and heatsink combo in
order to keep it’s temperature levels low. The only problem layout-wise
lies in the fact that the Promise ATA-100 connectors are placed behind the
AGP Pro slot, which could cause interference between the ribbon cables and
large AGP video cards. Other than that, the A7V133 design is functional
and user-friendly.
AMD 1Ghz Thunderbird
Socket A Processor:

The heart of the upgrade kit is AMD’s Thunderbird 1Ghz Athlon
processor. One of the biggest improvements over the original Athlon core,
(besides moving the processors from their original Slot-A package to a
convenient and more economical Socket package), was the ability of running
its Level 2 cache at full processor speed.
The original Athlon
processors would operate their Level 2 cache memory at certain fractions
of the processor’s rated speed, due to the fact that the memory chips
where not integrated into the processor die, but rather on the card that
housed the Slot-A processors. With the new Thunderbird core and AMD’s
successful move to an .18-micron manufacturing process, they were able to
integrate the Level 2 cache into the processor die, which now allows the
cache to operate at full processor speed. This means that if you overclock
your processor, you also gain more performance from the Level 2 cache
memory. So even though the Thunderbird only includes 256KB of L2 cache,
(lower than the Athlon’s 512KB of L2 cache), the Thunderbird core will
outperform the Athlon core because it’s L2 cache is operating much
faster than the original Athlon’s.
Of course, the rest of
the Athlon features apply to the 1Ghz Thunderbird, including the EV6
system bus, which is able to operate at 100Mhz or 133Mhz Front Side Bus.
But, the EV6 bus is able to work both during the rising and falling
signals, so you are basically getting 200Mhz or 266Mhz Front Side Bus
speeds, depending on the setting used. Even though all current Socket A
Thunderbird processors are clock-locked, (meaning you cannot specify a
custom clock multiplier), Dr. John did provide us with a clock-unlocked 1Ghz
Thunderbird for testing.
Testing Benchmarks And
Procedures:
Here are the components used to build the kit for testing purposes:
- Motherboard
– ASUS A7V133 KT133 motherboard using BIOS revision 1004
- Processor
– AMD 1Ghz Athlon Thunderbird Socket A, clock unlocked
- Hard
Drive – IBM DeskStar 34GXP 30GB 7,200 RPM ATA66 drive
- CDROM
– AOpen 1040 Pro 10X IDE DVD-ROM drive
- Memory
– 2x128MB CAS2 Corsair PC133 SDRAM modules
- Video
Card – Creative Labs 3D Blaster Annihilator 2 Ultra, NVIDIA drivers
6.50
- Sound
Card – Creative Labs SB Live! Platinum 5.1 using original CD drivers
- Modem
– 3Com ISDN Pro Terminal Adapter for Dual-Channel ISDN
And
the following benchmarking software and games were used
· 3D Mark 2001 – Mad Onion
· Content Creation Winstone 2001 version 1.0.1 – ZDBOP
· Quake 3: Arena version 1.17 – id Software
· Dethkarz version 1.0 – Melbourne House
· Unreal Tournament version 4.36 – Epic Games
In the case of game
benchmarking, all tests were run five times, rebooting the machine each
time for each benchmark run. Later, the five results were added and then
averaged. In the case of standard benchmarks, the results were run once
after a clean system reboot with only Explorer.exe and Systray running in
the background. OS used was a clean installation of Microsoft Windows
Millennium and the version 4.29a VIA 4-in-1 driver release. Even though
overclocking tests were done, for the purpose of the gaming and standard
benchmarks, the processor was left on its default 1Ghz speed, (10x clock
multiplier and 100Mhz Front Side Bus, memory operating at 133Mhz).
Graphics Subsystem Performance: 3D Mark
2001
Like I stated on my first impressions article, I’m really not
fond of Mad Onion’s 3D Mark benchmarking software. While it does an
excellent job of taxing computer systems with the latest and greatest
graphical effects, I don’t find its performance figures useful for
real-world comparisons. Sure, it is nice to compare it against a similarly
configured machine, but what do I care if my next-door neighbor with the
same computer gets 300 more 3D Marks than me? The individual frames per
second results on the different test games though, are much more helpful.
But, since you guys are hooked on 3D Mark 2001 and wanted scores from it,
here’s a screenshot of my result:
3,274 3D Marks might
seem like a really low number, especially when you consider the fact that
people consistently get 7,000 to 8,000 3D Marks with 3D Mark 2000. But the
main thing to remember here is that 3D Mark 2001 is heavily dependant on
your video card’s support for the new Direct X8 features. So my GeForce
2 Ultra 64MB DDR SDRAM video card was simply not up to the task that the
upcoming GeForce 3 is bound to fill. Still, that score is much higher than
the 2,345 3D Marks I got from my Pentium III 750Mhz system. And the
average frame rates I got from the different benchmark games were very
respectable, hovering around 35-40 fps on the high-detail demos.
Content Creation
Winstone 2001 Scores:
|
CC Winstone 2k1
|
AMD
Athlon 1Ghz System
|
Pentium
III 750Mhz System
|
|
|
33.2
|
28.4
|
As was to be expected, the 1Ghz Athlon system beat out my reference
Pentium III 750Mhz system by a good margin. Still, there is no question
that the 750Mhz did reach a pretty respectable score. But then again, when
you take into consideration the low cost of a 1Ghz AMD Thunderbird
processor, that number becomes fairly attractive.
Quake 3 Arena: OpenGL Performance
Under Quake 3 Arena, the 1Ghz Thunderbird system was tested using
the two demo files id software included with the game, Demo1 and Demo2:
|
Q3A Demo1
|
AMD
Athlon 1Ghz System
|
Pentium
750Mhz System
|
|
640x480x32
|
118.5
|
94.2
|
|
800x600x32
|
116.2
|
91.7
|
|
1024x768x32
|
103.7
|
82.4
|
Here we can see that
the KickAss Gear Athlon kit takes a sizeable advantage over my reference
PIII 750Mhz system. Ideally, I should have compared the Athlon system
against a 1Ghz PIII system, but I was not able to secure a PIII 1Ghz
system. Since the KickAss Gear unit has to go back next week, either I
compared it to my PIII 750Mhz system or I only used the Athlon numbers. Of
course, this article will be updated as soon as I can secure a reference
PIII 1Ghz system.
|
Q3A Demo2
|
AMD
Athlon 1Ghz System
|
Pentium
III 750Mhz System
|
|
640x480x32
|
115.4
|
90.4
|
|
800x600x32
|
114.8
|
88.1
|
|
1024x768x32
|
105.3
|
82.8
|
These demos also serve
to illustrate that the NVIDIA GeForce 2 Ultra GTS chip requires at least a
900Mhz or above processor in order to take full advantage of it’s power
and high-speed DDR SDRAM memory. As we can see from both demo scores, no
one will be able to complain from maintaining frame rates above the 100
mark. These tests were all run in 32-bit color, but if you take the
resolution to 16-bit you will be able to reach 140 frames per second on
the Athlon system, while breaking the 120 frames per second mark on the
PIII 750Mhz system.
Unreal Tournament 4.36: Direct3D
Performance
Even though Unreal Tournament as a game is getting old, there is no
question that it still remains one of the most demanding Direct3D
applications currently available. As such, it only seemed fair to include
performance numbers from Reverend’s Thunder demo:
|
UT: Thunder
|
AMD
Athlon 1Ghz System
|
Pentium
III 750Mhz System
|
|
640x480x32
|
89.45
|
75.76
|
|
800x600x32
|
86.32
|
74.16
|
|
1024x768x32
|
84.79
|
71.92
|
Once again, the numbers
speak for themselves. The 1Ghz KickAss Gear upgrade kit is pretty much
able to reach and sustain 90 frames per second in Unreal Tournament, while
my PIII 750Mhz system tops out at 75 frames per second. Theoretically, the
human eye is not able to perceive any difference on anything over 60
frames per second, but you can feel the difference when controlling the
on-screen action, and the higher the frame rate, the smoother the controls
will be.
Overclocking Test Results:
Being an unlocked processor, I was anxious to see what was the
limit for this puppy. So using the jumperless overclocking features found
on the ASUS A7V133, I started out slowly to see what was the absolute
limit for this particular processor.
Going with the clock
multiplier route first, I increased the clock to 10.5 on a 100Mhz Front
Side Bus, which yielded a 1,050Mhz speed. This isn’t exactly a huge
jump, so I moved up to an 11x multiplier, which yielded a better result of
1.1Ghz. After that, I moved up to 11.5, which resulted in a 1,150Mhz
speed. Unfortunately, using this multiplier resulted in the computer not
detecting my hard drive. Resetting the system only resulted in a hard
lock-up. So going with a multiplier-only overclock, the most stable speed
achieved was 1.1Ghz. Not a huge jump, but it did have a good increase in
the Q3A benchmark numbers:
|
Q3A
Demo1 OC
|
AMD
1.1Ghz Overclocked
|
|
640x480x32
|
128.3
|
|
800x600x32
|
126.7
|
|
1024x768x32
|
116.4
|
|
Q3A
Demo2 OC
|
AMD
1.1Ghz Overclocked
|
|
640x480x32
|
124.6
|
|
800x600x32
|
123.9
|
|
1024x768x32
|
118.7
|
With this overclock,
the CPU would max out with a 58 degree Celsius temperature under load,
which is pretty close to the maximum operational temperature for the 1Ghz
Thunderbird of 60 degrees Celsius. Still, I’m confident that with better
cooling solution, (the processor came with a standard-issue AMD heatsink
and fan combination), I would have been able to operate the processor
reliably at the 1.2Ghz level.
Going with a combined
multiplier and front side bus overclock, the system fared a bit better.
Using a 7.5x multiplier with the KT133’s support for the 133Mhz EV6
Front Side Bus, you can reach 1Ghz and take advantage of the higher
performance obtained from operating at a 266Mhz Front Side Bus and the
memory at 133Mhz. Using this method, the highest front side bus achieved
was 145Mhz, which yielded a speed of 1,089Mhz. I fell a bit short of
replicating the 1.1Ghz results obtained by overclocking the multiplier
only, as the system became unstable and crashed repeatedly when operating
at a 147Mhz FSB speed.
In both cases, running
3D Mark 2001’s demo mode for five straight hours tested the maximum
limits attainable. If the demo failed for any reason, the system was
reset, and if it failed again, the system was reverted to the setting
before the crash.
Conclusion:
Frankly, for $329, you really can’t ask for anything better than
what KickAss Gear offers with their Athlon upgrade kits. Even though
the official kits feature ABIT’s KT7A-RAID motherboard, there isn’t a
single user that could complain about the stability of ABIT’s offering.
You are also assured a system that is both stable, (thanks to the burn-in
process done at the store), and running at the highest possible clock
speed, (which means the processors arrive clock-unlocked for maximum
overclocking potential).
Offering blistering
performance and good value, it’s really hard not to recommend the
KickAss Gear Athlon upgrade kit. |
