Shortly after the Athlon processor was introduced by
AMD,
it was discovered that you could change the multiplier setting via
resistors on the printed circuit board. This was a messy,
time-consuming, and risky job if done with a soldering iron. But the fact
that the multiplier could actually be changed was a big surprise.
Then it was discovered that AMD had put an edge connector above the
resistor circuits on the printed circuit board, and these could be used to
access the circuitry that sets the multiplier and core voltage supplied to
the CPU. This top edge connector has been named the "Golden
Fingers", and overclock boards that attach to it have been dubbed
"Golden Fingers Cards".
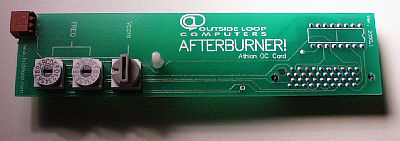
Enter "The Afterburner", a small
circuit board made by Outside
Loop Computers, which attaches to the Golden Fingers connector.
The
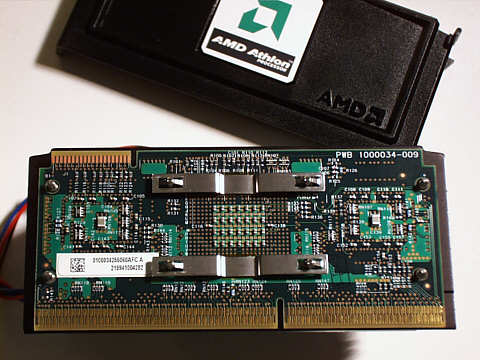
Setup: The first thing you need to do with the Afterburner card is
pry off the plastic case on the back of the Athlon. This is not hard
to do, but it's a bit nerve wracking taking a pry bar to your new Athlon
CPU. Only 4 snaps actually hold the back plastic plate on. Once you
have exposed your CPU's printed circuit board, you are ready to proceed.
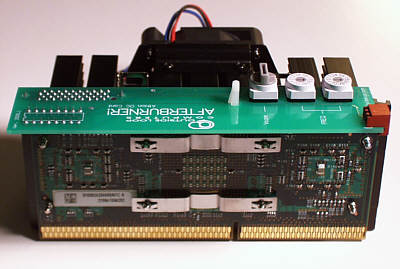
The Afterburner connects to the printed
circuit board's Golden Fingers connector via a socket, and is held in
place by a stand-off with adhesive on it.
There are two dials on the Afterburner for
setting the multiplier, and one dial for setting the core Voltage to the
CPU. The default voltage is 1.6 volts.
After getting the Afterburner installed on
the Golden Fingers connector, you just put the Athlon into the Slot-A
socket, attach a power cable that comes with the Afterburner to a free
power connector, and you're ready to go!
NEXT
=> The Testing
<=
BACK =>
Home |
